2. ISO
ISO is a measure of how sensitive the sensor of your camera is to light. The term originated in film photography, where film of different sensitivities could be used depending on the shooting conditions, and it is no different in digital photography. The ISO sensitivity is represented numerically from ISO 100 (low sensitivity) up to ISO 6400 (high sensitivity) and beyond, and controls the amount of light required by the sensor to achieve a given exposure
At ‘low’ sensitivities, more light is required to achieve a given exposure compared to high sensitivities where less light is required to achieve the same exposure. To understand this, let’s look at two different situations:
Low ISO numbers
If shooting outside, on a bright sunny day there is a lot of available light that will hit the sensor during an exposure, meaning that the sensor does not need to be very sensitive in order to achieve a correct exposure. Therefore, you could use a low ISO number, such as ISO 100 or 200. This will give you images of the highest quality, with very little grain (or noise).

Taken at ISO 100, the image does not show signs of noise
(even when looking at the 100% crop (right)
High ISO numbers
If shooting in low light ...
ادامه مطلب...
ادامه مطلب
1. Shooting modes
The best place to start is with shooting modes. The shooting modes will most likely be found on a dial labelled with ‘auto, Av, Tv, P, M’ and maybe more. Selecting a shooting mode will determine how your camera behaves when you press the shutter, for example, when ‘auto’ is selected, the camera will determine everything to do with the exposure, including the aperture and shutter speed. The other modes, ‘Av, Tv, P, M’, are there to give you control:
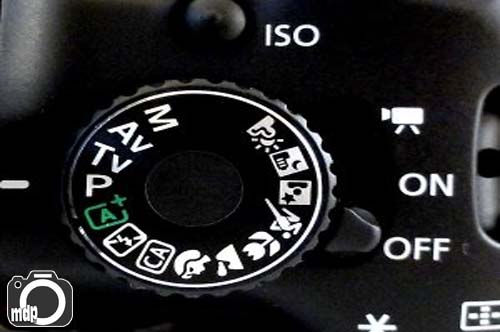
Don’t worry if your mode dial looks a little different; different manufacturers use different abbreviations for the shooting modes. Your mode dial may have the letters ‘A, S, P, M’ (instead of Av, Tv, P, M), yet they all function in the same way. Below, I have given each abbreviation for the given mode.
Aperture Priority (Av or A)
Aperture priority can be thought of as a ‘semi-automatic’ shooting mode. When this is selected, you as the photographer set the aperture and the camera will automatically select the shutter speed. So what is aperture and when would you want to control it?
The aperture is the size of the opening in the lens through which light is allowed to pass whenever the shutter is opened – the larger the aperture, the more light passes through.
The aperture is measured in ‘f-stops’ and is usually displayed using an ‘f-number’, e.g. f/2.0, f/2.8, f/4.0, f/5.6, f/8.0 etc, which is a ratio of focal length over diameter of the opening. Therefore, a larger aperture (a wider opening) has a smaller f-number (e.g. f/2.0) and smaller aperture (a narrower opening) has a larger f-number (e.g. f/22). Reducing the aperture by one whole f-stop, e.g. f/2.0 to f2/8 or f/5.6 to f/8.0, halves the amount of light entering the camera.
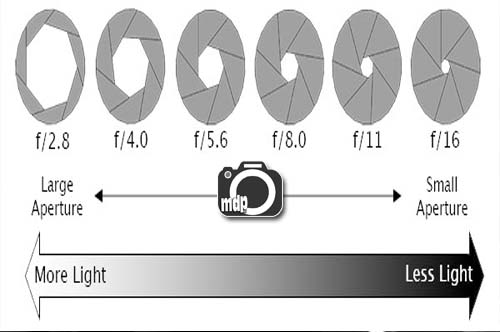
Aperture is one of the most important aspects of photography as it directly influences the depth of field – that is, the amount of an image that is in focus. A large depth of field (achieved by using a small aperture (large f-number)) would mean that a large distance within the scene is in focus, such as the foreground to the background of the landscape below.
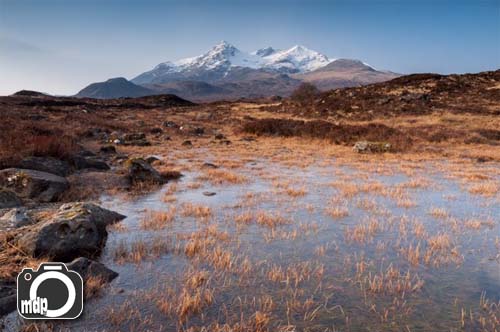
An aperture of f/13 was used here to give a large depth of field, ensuring that the whole image, from the foreground grasses to the background mountains. was sharp
Whereas a shallow depth of field (achieved by using a large aperture (small f-number)) would produce an image where only the subject is in sharp
ادامه مطلب
Canon EF-S 18-135mm IS lens intro
Canons EF-S 18-135mm f/3.5-5.6 IS is the company's new kit lens for up-market bodies, or those wanting to upgrade from the basic EF-S 18-55mm IS to something longer without breaking the bank. Announced in September 2009 alongside the EOS 7D and the up-market EF-S 15-85mm IS USM lens, the new kit zoom features a powerful 7.5x range and Image Stabilisation to iron-out any wobbles. It'll work with any EF-S compatible DSLR, which means all bodies apart from the ancient EOS 10D or those belonging to the EOS 5D or EOS 1D series.
The headline feature is of course the 7.5x optical range which allows the lens to zoom over two and a half times closer than the basic EF-S 18-55mm IS, allowing it to get much closer to distant detail. Mounted on a compatible DSLR, the EF-S 18-135mm IS delivers an equivalent focal length of 29-216mm, taking you from wide-angle to mid-telephoto, while including all the classic focal lengths for portrait work. The longer focal length also allows you to more easily blur backgrounds on portraits than the basic kit lens.
The EF-S 18-135mm IS also features Image Stabilisation to counteract camera-shake, with Canon claiming up to four stops of compensation, along with detection of panning and tripod use. The lens additionally features what Canon describes as an improved look and feel with a textured finish which matches their recent higher-end bodies.

In our full review of Canon's latest kit lens, we'll compare its build, focusing and optical quality against the budget EF-S 18-55mm IS zoom to see what you can expect when upgrading, or opting for the longer lens with a new body from day-one.
We've also compared it against the more up-market EF-S 15-85mm IS USM, along with the earlier EF-S 17-85mm IS USM, again to see what you can expect in terms of build, focusing and optical quality. You'll also find a number of results which include the EF-S 18-200mm IS super-zoom for comparison. So if you're in the market for an affordable kit zoom lens, or are wondering what exactly you get when paying double the price, you've come to the right place!
Testing notes
We tested a final-production EF-S 18-135mm IS lens (serial number 5902504695) with various Canon bodies including the EOS 7D and EOS 450D / XSi. The EF-S 18-135mm IS will work with all EF-S compatible Canon DSLRs, which includes all but the 1D and 5D series. It is not compatible with bodies employing larger sensors such as full-frame or APS-H models, nor those which predate the EF-S standard, such as the EOS 10D.

به دلیل استقبال و توجه خوانندگان هنردوست و هنرمند به سری مقالات 'چگونه یک اثر هنری را تجزیه و تحلیل کنیم؟' در ادامهی ارائه روش تجزیه و تحلیل نقاشی، به 'روش تجزیه و تحلیل عکس' نیز میپردازم. در مقالات آتی با انتخاب عکسی مناسب با کمک و همراهی شما خوانندهی فرهیخته به تجزیه و تحلیل آن خواهم پرداخت. پیشنهادات و مشارکت صمیمانهی شما عزیران را تمنا دارم.
"نگاه تو مهم است، نه در آنچه مینگری." – آندره ژید (مائدههای زمینی)
گام اول:
توصیف عکس: شامل شرح موضوع عکس و صحبت از محیط اتفاقی عکس است. اطلاعاتی دربارهی عکاس، زمان عکاسی و محیط اجتماعی که عکس از دل آن سربرآورده است. این مرحله مهم است زیرا باعث گردآوری اطلاعاتی است که به درک عکس کمک میکند.
توصیف یعنی گفتن و نوشتن از آنچه که به ... ادامه مطلب...
ادامه مطلب
حتما شما هم علاقه دارید تصاویری مانند تصاویر زیر بصورت بسیار کند ایجاد نمایید. در زیر نمونه هایی از این تصاویر را میتوانید مشاهده نمایید.

ادامه مطلب ...
ادامه مطلب
تکنیک زوم انفجاری:
۲ – آماده شوید.
۳ – مهمترین قسمت اینجاست.

ادامه مطلب...
ادامه مطلب
در حالت عادی تمامی یک مکان یا تمام یک نمای طبیعت را نمی توان به طور کامل در تصویر جای داد. با تکنیک HDR شما می توانید تصاویر خاص دیگری را خلق کنید.

ادامه مطلب ...
ادامه مطلب
حتماً این سوال در ذهنتان ایجاد شده که بوکه چیست؟


ادامه مطلب...
ادامه مطلب
۱ – عکس های با شاتر طولانی

ادامه مطلب

سیلویا للّی، به مدت هفده سال، عکاس رسمی تئاتر اسکالای میلان – ایتالیا (Scala) بوده و اکنون مسئول تدارکات مـَستر عکاسی در آی.ای.دی (IED) – موسسه اروپایی دیزاین و طراحی – است.
آنچه میخوانید خلاصهای از گفتگوی مجلهی اینترنتی لینکیستا (Linkiesta) که در ایتالیا منتشر میشود، با للی است. او در این مصاحبه به ترسیم شرایط فعلی نه چندان مثبت عکاسی در ایتالیا میپردازد. وی معتقد است آنچه را که عکاسان نباید فراموش کنند این است که باید تغییر و تحولات را بشناسند، بپذیرند و به آن عمل کنند. بهخصوص ....ادامه مطلب...
ادامه مطلب
.: Weblog Themes By Pichak :.
نظرات کاربران
دیدگاه خود را با ما در میان بگذارید